Language, Resources, Technology, Therapy Tools

Lights, Camera, Action!! Using Videos as a Therapy Tool

 One of my personal goals this year is to increase the use of technology in my therapy sessions. Much of my “free” time can be spent compiling lists and exploring possible resources, applications, Universal Design for Learning strategies and interactive programs. I do plan on purchasing an iPad in the near future to use in my private practice, so I have been bookmarking lists of apps and other resources that the iPad offers. Though the school district for whom I also work has not yet authorized the use of iPads for instructional use, I feel quite fortunate to work in a setting that does offer a variety of  additional technology resources — flipcams, smartboards, the ActivPanel I now have in my therapy room, and more. I have developed a few favorite tools that students really seem to enjoy, and the opportunities for engagement and interaction have increased immeasurably. I like to think I am pretty engaging all by myself, but there is something to be said about therapy that includes music, color, sound, movement, and electronic modes of presentation. Children today are wired for the technology (read more about this thought in my Signs of the Times post.)

One therapy tool that is quickly marching its way into first place is the use of video to target speech-language goals.For students whose performance is greatly enhanced with the use of music and visual stimuli, videos help to secure focused attention and engage their minds for interactive learning.  I often insert a video into a smartboard lesson, designed to reinforce a theme or idea. Below is a video I found recently on Youtube, which I used in a caterpillar/butterfly seasonal theme. I used the video in a smartboard lesson that reviewed the lifecycle of the caterpillar/butterfly, and reinforced the recently presented story, The Very Hungry Caterpillar by Eric Carle. The video helped to help model use of descriptive concepts, and we used colorful scarves to incorporate motor movement and sensory input as we pretended to fly like the butterflies. Students were absolutely mesmerized by this tranquil video!  They readily formulated their own phrases and sentences to describe colored butterfly pictures following the video:

I’ve also posted recently about using Animoto to create videos using music and selected images.  I made another video  today with a group of students to target expressive language, descriptive concepts, theme vocabulary and answering wh questions. To introduce summer theme vocabulary, I created a folder of Google images showing kids enjoying a variety of summer activities. Students took turns selecting the pictures they wanted to use in the video, and we practiced individual speech-language goals as we selected the pictures. Here is a visual I created to highlight the sequential directions for this video-making activity:

After we selected pictures, we uploaded them to Animoto, added the music track, and reviewed our objectives/progress while we waited for the video to finish “production” (a process that only takes a couple of minutes.) Then we were ready for step 4 — watching the video! I just loved seeing how connected and animated my students were when they saw the video and recalled the images they contributed. I noted increases in attention, participation, spontaneous verbalizations and use of targeted concepts in ALL students in the group. Here is the video that we made:

With so much success, I plan on using video as a therapy tool as much as possible — flipcam video  and mobile device  image uploads to star students themselves, interactive video clips in smartboard files, youtube videos that highlight concepts or themes, and other educational videos from sites like BrainPop, PBSKids, and more.  I still reserve time and energy to create hands-on activities using games, toys, concrete objects and pictures; but the use of video as a therapy tool is clearly a winner in my book…er, umm– electronic reading device. 🙂

Assistive Technology, Free Downloads, Holiday Theme, Language, Resources, Technology, Therapy Tools

Going Green – Earth Day Activities Part 2

Wow, what an overwhelming response I received after being featured as a guest contributor on PediaStaff, sharing some of my Earth Day activities!  I decided to share a few more ideas for those of you looking to plan your week with Green therapy, technology and activities that incorporate UDL strategies.  Please feel free to click, download and share any of these resources. Enjoy!

Here is a lively video teaching kids to Reuse, Reduce Waste, Recycle. It will get everyone up, dancing and moving as they learn about the 3Rs of helping the world: 

Are you looking for even more visuals/activities to address goals with Earth Day vocabulary? Here are a couple of creations for you — Free downloads!

Looking for some Earth Day Books to share with your students? Check out some of my favorite theme-based books that will reinforce the concepts you review in therapy sessions. Many of these books are available in e-reader and audio versions as well as print:


Also, I previously posted about a site that offers free online versions of books. For every book read, they make a donation to literacy campaigns around the world. What better way to help your students feel good about working to make the world a better place?? If you are not yet convinced, please watch this video that gives you an overview of the Pearson Foundation inititative. It is well worth a couple of minutes of your time:

So get reading! Use your computer, laptop or smartboard to create a multi-media, interactive story time that will also make you and your students feel good about helping others. Here are a few Earth Day selections (by the way, this post is not a solicited review of their site or program…I simply think it is a wonderful idea for many, many reasons!):

I hope you enjoy these ideas designed to offer engaging activities with multiple modes of presentation. The more I learn about what works in speech-language therapy, the more passionate I become about incorporating technology into my sessions. I would love to hear from those of you who are using similar technologies with your students. Thank you for visiting LiveSpeakLove!

~Lisa

Free Downloads, Language, Resources, Technology, Therapy Tools

Creating Multi-media Videos Using Pinterest Images

I wanted to share a successful activity that I used with a group of students. We have been working on the  formulation of sentences using correct verb forms. I posted previously about how to quickly extract Pinterest images  from PediaStaff Pinboards to create activities for my interactive smartboard. We have all enjoyed the use of technology in our sessions, and students especially the sound files that are played as they interact with the images. Here is a snapshot of the activity I previously posted:

I have also posted previously about using Animoto to create multi-media videos using images I select.  Students have really seemed to love the videos I have used so far. I decided to have a group of students help me create a video as part of their speech-language therapy, using images I extracted from the PediaStaff Action Verb Photo Library on Pinterest. To start, we reviewed the folder of images I extracted from the photo library, stored on the computer. Students took turns choosing which pictures they wanted to include in the video, and produced a sentence with their targeted verb form (e.g., “The lion is roaring.” or “The boy was crying because he was tired.”) As they took turns, I copied their selected images into a newly created folder to use for our Animoto video. After all the images were selected, we easily and quickly made our Animoto video. To make the video, we uploaded an mp3 file I bought for 99 cents from Amazon, and then we uploaded the images students just selected. We added a couple of text slides (as we reviewed the concept of Action Words, and the different verb forms each student was currently working on as their objective.) Ta-da!! Our video was created. After a couple of minutes to discuss each student’s progress, our video was ready to view. Students were amazed that the work they just completed was instantly transformed into their very own music video! This activity reinforced their work in such a dynamic, rewarding way. Students were excited, beaming and abuzz with chatter about how they had just made their own video — definitely a success!! I plan on using this technology tool again very soon. For your viewing pleasure, here is the video that my students created:

Interested in trying Animoto for yourself? Click here: Animoto

Technology, Therapy Tools

Time to Tweet

Ok, I am finally taking the plunge…yes, it is time for Twitter. Starting this blog has been an exercise in moving a bit out of my comfort zone–in a good way, of course! I am delighted at the response my little blog has received so far, and I am finally pushing myself to do more of the things that excite me about my profession. I have boldly professed to love technology, online resources and professional collaboration. I have spent more time than I should have in the wee hours of the night researching therapy resources, caseload management techniques,  document sharing tools and other apps that get me fired up and excited about being a bit of a tech geek. But in all this research, discovery and technology-induced lack of sleep…I have resisted Twitter. Why? I am not really sure. Perhaps I’ve been afraid of entering yet another online arena that might very well suck me in and induce a mental time warp, leaving me with another way to lose sleep and avoid housework. More nights than I care to admit I have looked up from my laptop, blinking in disbelief at my clock. How can it be that hours, not minutes, have passed since I tucked the last child into bed for the night??  I mean, isn’t Facebook, WordPress, Blogger, Google Play, LinkedIn, and Pinterest enough for this busy SLP mom? (Now that I think of it, actually, how bad could it be to add one more thing?) I am easily swayed  encouraged by those people who really think I should fly on over to Twitter. I have quite a few blog followers asking if I am on Twitter yet, wanting to get connected. So, I finally decided to take the plunge! I am currently a bit lost, which actually cuts down on the possibility of entering a mental time warp anytime soon. It will take me a while to develop some tweeting skills –it’s a whole different world.  But if you want to connect with me there, feel free to “follow” me and tweet me or hashtag me, or something like that.  Find me on Twitter here. I look forward to connecting with other SLPs, bloggers and the like–I hear there is quite a network of collaborators!

For now, I am off to do some Twitter research. I did find this very helpful post from EduBlogs that will surely speed the learning process for me. If any of you have any helpful Twitter info, I would love to hear it. I would also love to hear how you are using Twitter for your blog, website, private practice, etc. Feel free to comment below with your ideas and feedback.

Thanks, see you on Twitter!

Lisa, A.K.A.  @LiveSpeakLove

Articulation, Free Downloads, Holiday Theme, Language, Therapy Tools, Thoughts and Inspirations

The Egg-stravaganza Continues!

We’ve been having a fun-filled, colorful time in speech-language therapy! Out of all the Spring activities I’ve tried, students have been most enthusiastic about using the colored, plastic eggs I purchased for a few dollars at my local craft store.

I’ve paired the eggs with other technology-based activities, like the virtual game-board I featured in my last post. I used this activity in my therapy room, and also in the classroom setting as a co-treatment with the social worker. We used previously-posted pragmatic questions inserts for the eggs, and each team got to pick an egg and answer the question when it was their turn. Because the pragmatic questions were a BIG hit out in blog-land (as judged by Pinterest pins and downloads,) and because I found I needed some lower-level questions for those students needing more concrete stimuli, I also created an additional set of pragmatic inserts for you to download:

I also co-treated with the occupational therapist in an adaptive classroom setting. We filled the eggs with these “Following Direction” inserts and “hid” the eggs around the room. Students got to hunt for eggs, then we answered the questions or followed the directions that were in the eggs. We did many of the directions as a whole group, and each student got to come to the front to demonstrate to the class when it was their turn. For directions requiring drawing, we used the classroom smartboard, but you could also use a chalkboard, dry erase board or easel.

Another fun activity I’ve used in large and small groups working on simple descriptive vocabulary is to pair the eggs with colored pom poms and colored objects. Students can pick a color/colored object, and then hunt for an egg that is the same color. Sentence formulation, use of color words in descriptive phrases, matching and answering simple what and where questions are all targeted in this active game.

I used the following visual for language support with students who needed the visual input to assist with formulation of sentences using the concepts:

I also paired the colored eggs with pacing board activities as an extra motivation for students working on length of utterance, fluency strategies and/or sequencing of sounds for multi-syllabic words. Students “stamped” on the pacing board with the egg, or tapped the top of each egg as they spoke to mark the sounds or syllables. The same materials could be used as a token reinforcement system where students earn each color for the trials they produce. Students working on matching activities could also use these tools.

I’ve recently been described as often posting activities with a “seasonal bent,” and I’d say that is definitely true. I just can’t resist all of the holiday fun! Some of my best childhood memories revolve around the holidays, even seemingly insignificant ones.I like to think I am creating memorable experiences for students, using motivating activities that target goals and keep kids moving and smiling while they work.

Free Downloads, Resources, Technology, Therapy Tools

Interactive Virtual Game Boards on your Smartboard or Computer

So many people have given me positive feedback about the Spring resources available for download in my Spring Egg-stravaganza post. One of the resources I posted was an open-ended game board — both a printable version and an ActivInspire flipchart version. For those of you who do not have ActivInspire, you can download it for free HERE. Check out this video for an overview of the kinds of things students can do with this program:

Obviously, if you have a smartboard, there are limitless possibilities for engaging students in multi-media therapy activities. I feel very fortunate to work in a school that had available funds and generous administrators. Earlier this year, my school purchased a desktop version of a smartboard for my therapy room. I have been using this technology to create a variety of lessons using pictures, audio, video and interactive design features that all my students love.  Some of the files I create are complex, time-intensive and include pre/post assessment data collection where students respond using wireless ActiVotes. Some, however, like my Spring/Garden game board are really quite simple. To make this game I just imported the image of the game board (an image I actually used ActivInspire to create, but you could use any image — even a snapshot of a real game board,) then I added circle shapes to use as game pieces, and inserted the dice tool. Suddenly an ordinary game (with a dash of technology added) became a highly engaging therapy tool to target any objective needed. My students love the online game boards so much more than any “real” game. Here is a picture I previously posted of a couple of students interacting and playing a game using my desktop smartboard:

But what if you do not have a smartboard? Not to worry, you can still use these interactive files on your computer. You just need to use a mouse instead of the stylus (unless you have a touchscreen.) An adaptive mouse can help those with fine motor difficulties access this technology. You will just need to pair the game with stimulus materials or verbal prompts to elicit/train a skill, and your students will love playing the interactive, virtual game in their speech-language sessions.

If you want to download this file, just make sure you have ActivInspire installed on yourcomputer, then click on the image below.

By the way, I have no affiliation with Promethean or ActivInspire, and this post is not a solicited review. I really just love using this program, and I think you will too.

 Thanks for visiting LiveSpeakLove!

~Lisa

Articulation, Resources, Therapy Tools

Tricky Sounds: Correcting For Lateralized Airflow

I was recently asked to offer some advice about correcting for those tricky sound errors — lisps and lateralized productions of  the sibilants /s/, /z/, /sh/ and /ch/. If you are an SLP, you can probably detect a lisp or a lateralized /s/ on every affected public speaker, casual acquaintance or celebrity you have ever had the pleasure to encounter. My husband makes fun of me for the way my ears perk up and how the expression on my face clearly changes whenever we are listening to someone with an /s/ distortion. I suddenly have the urge to offer these speakers nonverbal feedback as we interact. Sadly, I can’t help it; it’s an affliction. Even if you are not an SLP and have no desire to cure the world of lateralized airflow patterns, you may be able to detect that something is not quite right in the way a person says their /s/ and /z/ sounds— the words come out sounding “slushy,” “sloppy” or even “garbled.” I once had a teacher tell me that their student with a lateralized /s/ sounded like he was “pretending to be a ventriloquist.”  This statement was actually not an off-target description. 

Lateralized airflow sound distortions are unfortunately some of the hardest to correct. While I am an SLP, and therefore, an “expert,” I do not profess to have any secret knowledge or special talent in correcting these tricky sounds. I have struggled along with the rest of you in finding ways to train for correct sound production.  I am happy, however, to share what has worked for me more often than not in the past fifteen years.

In my opinion, the issue of lateralized airflow distortions is two-fold, and requires training on both factors:

  1. Students do not have a correct tongue position for these sounds (and often the tongue position at rest is incorrect as well.) These sounds must be produced with the tongue elevated to meet at the alveolar ridge or surrounding area.
  2. Students do not have a correct frontal airflow stream (probably secondary to incorrect tongue position) . When the tongue is elevated at the alveolar ridge area, a slight groove is formed in which airflow is then directed in a stream out the front of the mouth. When the tongue remains low and flat, no slight groove in the center of the tongue is formed to direct the airflow out the front. The air escapes out the sides of the tongue and the distortion is produced.

Unfortunately, the tongue and airflow patterns are habitual and must be entirely retrained for correct sound production. Therapy on these sounds begins with ongoing student education for tongue position and airflow. I often begin with pure discussion and education using mouth diagrams, puppets, mirrors, and visuals. I then begin training with some oral motor tools or tricks like dots of icing on the alveolar ridge or other tactile feedback to elicit correct tongue placement. I have students practice in front of mirrors and watch me as well. My school  recently purchased these mirrors for my therapy room so that each student has their own for practice (great for preventing “downtime” while I give individualized feedback to other students in the group):

Once the initial training and tactile feedback has been provided, I quickly move into practicing target sounds in isolation and then in syllables or words. I use a variety of methods including verbal, visual and tactile strategies to help students train for correct placement and airflow. I have visuals for each target sound that offer descriptions so students can more easily remember the placement and manner of the sounds. I usually start by targeting /s/ in isolation, though I do not believe that this sound is scientifically proven easier to produce than any of the others. I just personally find it easiest to elicit, especially when introduced as “the sneaky snake sound” and paired with different snake games/activities. Every therapy session I conduct is structured to include education, discrimination, direct training, and then practice (often using  games or other motivating activities) to target sounds in isolation, syllables and words. These activities all include the following visuals (or similar.)

Below is a visual that introduces each sound and gives them all a “name” to represent sound attributes in some way. At the bottom of this visual is a three-step process chart that helps to elicit correct placement and airflow. I have had very good success using the cue “Teeth Together.”  This cue is something much more concrete and outwardly visible than the more elusive “tongue elevation to the ‘bumpy spot’ behind the teeth.” For some reason, tongue placement seems to greatly improve and inhibit lateral airflow when the upper and lower central incisors meet in front (not in a smile, though, which tends to drop the tongue and foster lateral airflow. Think “show your teeth” in a Lady Gaga kind of way.) Students can see their teeth together; they can replicate it easily, and for whatever reason, it often works when it is done correctly. Students are also trained to hold their hand or finger in front of their lips and feel the airflow as they speak. Sometimes this trick is enough to elicit the frontal airflow pattern and progress is made quickly as the student has built-in cues and biofeedback wherever they go!

Another visual I like to use is this discrimination tool that can be used both with the student listening to modeled productions or when producing on their own. The clinician can provide the feedback using the visual, or the student can self-evaluate their own productions:

 Students are encouraged to practice their sounds on their own using their hand as a self-cueing strategy for frontal airflow detection:

As we move into practice using syllables and words, I select the syllable or word targets to specifically shape and elicit correct tongue placement. I choose syllables and words using vowels that are produced higher in the mouth (usually /i/ and /u/) to move away from the low, flat tongue patterns used in /a/ or with a schwa. I also vary the position of the sound in the word or syllable:

Another way I elicit correct tongue position is to shape sounds across word boundaries using alveolar sounds that the student has already mastered. Here is a visual I use with students to shape the /s/ from /n/ across preceding and subsequent word boundaries:

As a student becomes more independent, the same pictures can be used to create sentences for practice at a higher level. My go-to games are often open-ended game boards, commercial games or interactive activities that can be paired with specific stimuli or picture cards using the currently targeted sound or sounds. I also use barrier games or student-led activities with a focus on peer feedback to encourage generalization to other settings. I often have peer partners that will develop their own nonverbal signal to prompt for correct placement or airflow.

Above all, a student needs to “buy in” to the training and practice their skills in other settings. This is why all of my speech therapy sessions incorporate the pieces of education, discrimination, targeted training and practice. If students are reluctant  to practice or do not self-cue or self-monitor, then progress will likely be much slower. Systematic training in tongue placement, frontal airflow stream,  how to self-cue and monitor, and how to practice are essential components of a treatment program for lateralized airflow sounds. The treatment program may seem endless some days as you train and educate, but eventually, most students “get it.” I consider my work with these students just as important as my work with nonverbal or language-delayed students and I applaud those of you who work tirelessly to improve communication skills on any level. Good luck with using these techniques, and I’d love to hear if there is something else that has worked for you. Please share — it’s exactly what I love about the internet!

Language, Resources, Technology, Therapy Tools

Extracting Images from Pinterest Websites

I’ve been racking my brain all week, trying to think of a way to use the idea Jenna posted this week on her blog, Speech Room News. She is using the app Tapikeo to quickly download images and pair them with voice audio, creating a fun, multi-media activity for students.  

Without an iPad, I do not have a way to use the Tapikeo app, a wonderful program that makes saving pictures into a program and adding audio a breeze. I did contact the app’s creator, Jean-Eudes Lepelletier, a busy dad of two who designs apps for iTunes in his free time. He very kindly responded with partially good news. While Tapikeo is not currently available on Android devices, his newest upgrade will include an export feature that allows photo grids to be shared with others via HTML. I am hoping that those creative SLPs with iPads out there will be sharing their photo grids very soon!

In the meantime, I did discover a relatively easy way to quickly download PediaStaff’s images and import them into an interactive smartboard program with audio. The process is actually fast and simple, but it does involve a few steps:

  • Install Nitro PDF (this FREE downloadable program easily converts any file or selection to a PDF file, even from the web. Just choose “Nitro PDF” as your printer when you go to print. By the way, this program is a wonderful tool to convert those Boardmaker files to PDFs for easy sharing.)
  • Next, go to PediaStaff on Pinterest and scroll down to your Photo Library of choice — they now have many different photo boards, filled with theme-specific images to target a variety of skills.
  • Once you are in the photo library, simply PRINT the webpage (Don’t forget to change your printer to Nitro PDF!)


  • NOW comes the fun part! After you have a Pediastaff photo library converted to a PDF, you then just need to select “Extract Images.”

Clicking this powerful, little EXTRACT IMAGES  button will instantaneously save each image to your computer!! No need to” right click and save as” on every image on the Pinterest board…just extract and you have each file saved separately in the same folder as your original PDF.

Here is a snapshot of my end result:

Once the images are saved (instantly!) to your computer, you can then create a fun, interactive activity with audio using PowerPoint or an interactive smartboard program (I use ActivInspire, which does not require a smartboard — use this program right on your computer with a mouse!) Below is a snapshot of the activity I created using action verb pictures  paired with audio (as Jenna did in her initial example.) Students circled, highlighted and wrote text on this flipchart page, and when they clicked an image the audio was activated. I embedded audio using simple, present progressive verb sentences (e.g, “The boy is yawning.”) as well as past tense verbs (e.g., “Yesterday the boy screamed.”) We also practiced higher level skills with each trial…these images are perfect for incorporating “I wonder” statements like, “I wonder why the boy screamed?”  to elicit inferences. I love using “I wonder…”  sentences to promote those critical thinking skills along with the lower-level objectives.

So, even though the Tapikeo program is not an option for me right now, I can still very quickly and easily create activities by instantly downloading libraries of images through a PDF conversion and extraction. Perhaps this is an example of collaboration at its finest…Pediastaff, Tapikeo, Speech Room News and LiveSpeakLove all working together to create ideas for wonderful speech-language activities! I’m thankful for the inspiration…hopefully you will feel the same.

Thanks for visiting LiveSpeakLove!

~Lisa

Resources, Technology, Therapy Tools

Technology News – Google Play Now Available

Ok, all of you tech-savvy SLPs, educators and parents…here it is. The launching of a wonderfully convenient media tool that will surely increase your productivity, creativity and use of technology– Google Play.

Many of you know that I am an Android device kind of girl, and I have had great success using some of the Android-based features as case management tools to streamline paperwork and sync documents between my devices. I admit that I feel a bit left out of the iPad craze in speech-language therapy sessions, especially when people like SLP Jenna over at Speech Room News post fabulous ideas and resources for using the iPad to target therapy objectives. Take a peek at her latest:

I’ve been thinking that even though my school district currently does not approve the use of mobile or tablet devices with students, surely there is a way to use my android device to at least prepare similar resources that can be presented to students on a desktop or laptop computer (if you are asking yourself, “what’s the difference?” you are not alone. I have faith that my very large school system is working on a process to approve and integrate mobile/tablet devices for use with students. For now, we have wonderful resources to use like the ActivPanel and other interactive smartboards, student voting/response consoles, and interactive web-based software like ActivInspire, Edmodo and Voicethread. The mobile devices are coming, but developing empirically based best practice standards for these tools is a process. 🙂 )

In my ongoing search for tools to create dynamic, engaging therapy materials and productive work solutions, I am extremely pleased to see the anticipated launch of Google Play. Google Play is now integrated with the previously known Android Market, now providing a one-stop shop for app selection, purchase, storage, and back-up. In addition to the Android Apps, Google Play also offers the same options for all of your other media as well. Even if you do not own an Android device, you can still upload all of your music and other media to the Google Play “cloud” for storage and anytime access. Check out how Google Play now provides shop and share features, Cloud storage and instant syncing to all of your devices for ALL of your media:


While this may be a marketing move from Google to branch out into territory previously dominated by powerhouse media providers like  iTunes, Netflix and Amazon’s Kindle, this move opens quite a few doors for a busy Android user like myself. I love that all of my apps, music, photos, videos, and books are integrated into a single point-of-entry design. Google Play also lends itself nicely to using other Google features like Google Reader, Google Docs, Gmail and Google Calendar (all applications that are also accessible on my Android.)

So while the iPad may be the sexy, trendy tool for most therapists, I find it very exciting to be an Android user and discover even more possibilities that can easily translate from mobile device to work desktop to laptop to home computer…instantly. I will continue researching to explore which apps will work with the current regulations of my school district, and develop more therapy tools using the technology we have available. Be sure to look for upcoming posts in the (hopefully) near future as I spend some time researching and creating with the apps I find. In the meantime, here are a few links to sites where people have obviously done quite a bit of Android research themselves:

If any of you are using Android device and apps as part of your clinical management, practice or therapy, let me know. I would love to hear the kinds of things people are using and if you find Google Play a useful media management tool.

Caseload Management, Organization, Technology, Therapy Tools, Thoughts and Inspirations

Come on In!

Inspired by SLP and fellow blogger, Jenna Rayburn of Speech Room News, I decided to respond to her Anatomy of a Speech Room challenge and take some pictures of my therapy room. This challenge came at a good time because I have been playing around with the configuration of my little room a lot this year. In the past, my tiny room has been overpowered by my desk, two large file cabinets, and a large round table that sat smack in the center of the room. This arrangement left very little room to stand or move, which proved a bit tricky in some of my therapy sessions (picture me, children with wheelchairs or walkers, a graduate student intern and an additional adult assistant all wedged in around a circle table — yes, can you say CROWDED???) Earlier this year, my super-organized and ambitious student intern helped me brainstorm a bit to come up with a better layout. We packed old files into boxes to rid the room of a file cabinet, traded out the round table for a small rectangular table (a feat which involved me following our building custodian into the boiler room storage  area— seriously, that “room” is straight out of Nightmare on Elm Street; Freddy Krueger just may have been lurking in the shadows! But, I got my table.) Suddenly, the room seemed much larger and brighter, and my groups could all fit in the room without experiencing claustrophobic attacks. I could also access therapy materials or files without fear of gouging my leg on a file cabinet drawer (yes, that actually happened to me. Ouch.)

All was well until earlier this month when I got my new ActivPanel interactive smartboard (note: I am NOT complaining about this gift, but setting up the device and adjacent laptop did require some more shifting.) After some trial and error with cords, placement of the ActivPanel, student access methods and ways to connect to the Internet, I think I finally have a room layout I like.   I am feeling pretty happy about the space — even though it’s small, I think about how the room is a big step up from the room I had right out of graduate school, when I shared a book closet with the school psychologist! (That was another creepy Freddy Krueger space…dark and dingy with stacks of books all around me.)

Check out the pictures below for a tour of my new and improved, geeked-out therapy room!

Here is my room as you walk in the door. I have the therapy table and also a (new) rug where I do floortime play with some of my little ones (as young as three years old.) 

Once inside the room, you can see the table and the ActivPanel set-up, with my chalkboard and the visuals I keep handy.

Here is a closer look at the ActivPanel and the board. The lower right quadrant of the board is where I write my objectives — definitely a challenge in groups with varying skills and goals, but I usually try and write something all-encompassing so that they have an idea of what we are doing:

Underneath the ActivPanel (housed on an old, door-less cabinet) I keep printer paper, construction paper, and bins for easy access to lesson plan materials:

At the table, students sit on one side and the end (enough for 4, which is my largest size pull-out group,) and I sit on the side with the laptop and board. This way, students can all see the ActivPanel and they can walk up to it when it’s their turn. I previously had the ActivPanel sitting at the far end of the table, but students were reaching across each other, and trying to get close enough to the board to use the stylus was difficult. So far, this new set-up is working out very well. The laptop sitting to the left of the smartboard provides input to the smartboard. I also use the laptop to enter student data into log spreadsheets (which is actually difficult when I have the students there with me, so really I end up entering data into my log files later…but I do try. More on that topic in a subsequent post.) I also have frequently-used supplies within reach in the space around me while I conduct therapy sessions:

The shelf behind my therapy table (on the left in the above picture) is covered in fabric. I attached fabric to the shelf unit using heavy-duty velcro as a way to hide visually alluring items from easily-distracted and/or impulsive students. When needed, the fabric is easily removed to access books, puzzles, and a variety of games I use to target speech-language skills:

To the right of the chalkboard, I have a vertical file on the wall where I keep picture schedules, low-tech communication boards, core vocabulary boards and other useful visuals. I also have an emergency clipboard I keep handy for fire drills and other emergency procedures:

Here’s my desk (ok, I admit I did organize the surface of the desk a bit before I snapped this picture! I often have IEPs, reports and other papers in a stack, among other things. I am trying to make sure the desk looks at least this neat before I leave each day.) The wall behind my desk technically leads to another office, and you can see there is a two-way mirror there. My “neighbor” has her side covered with paper, but I have grand visions of having the whole office suite to myself, creating a therapy room and separate observation room:

To the left of the desk, I have a storage cabinet covered in fabric, my printer, and a pocket chart with visuals I have hanging on the wall (door.) The fabric keeps the toys hidden until they are offered, and the pocket chart allows easy access to visuals I often use to prompt students for behaviors.


Toy bins under the fabric:

At my desk I also have a Pinterest-inspired place to store my Team notebook (holds parent questionnaires, assessment logs, and anything else I may need at Team,) and activity files/other materials that I am currently using (activity files not in use are stored in the file cabinet underneath this desktop storage.) I got the dishrack at a thrift store for $1.00…works for me!

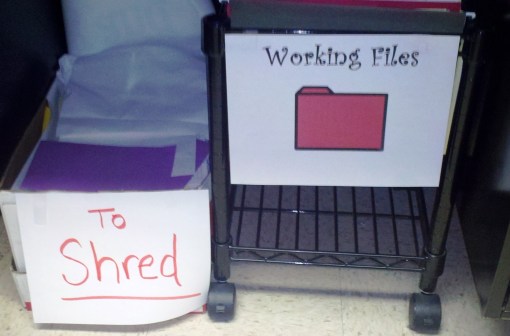
I even use the space underneath my desk — a “shred” bin for those confidential papers, and a rolling file cart that houses a “working file” for each student on my caseload. I use these files to store individualized therapy materials, most-recent progress report and a current copy of the IEP. Some of my students have speech-language files several inches thick that date back as many as six years; this working file system rolls out when I need it and helps keep current information easily at my fingertips.
Beyond my desk is a built-in shelving unit that is not quite accessible, due to the large file cabinet I needed to put about a foot or so next to (in front of) it. I store mostly books and materials I don’t need that often on this shelving unit, accompanied by pictures of my kids and other trinkets:

I also have a built-in cabinet where I house art supplies, story board characters and pieces, cooking supplies, picture cards (ones I do not use frequently,) seasonal items and miscellaneous therapy supplies. The cabinet is spacious and holds a lot of items in an organized fashion:

At the far end of the room, I have a refrigerator (my own) with some storage on top. In the storage drawers I keep things like glue sticks, stickers, game pieces, dice, and magnetic chips. Markers, crayons, pens and pencils are also within reach:

Above the refrigerator, there are some open shelves where I keep enticing toys (up out of reach so that students have to make verbal or picture requests. No rewards for pointing in this room!) I also have free-standing therapy mirrors, and roughly two-ton pottery pieces that my sons made at pottery camp many years ago; I can’t yet bear to part with them…perfect top shelf office decor! 🙂

To the right of the refrigerator (and behind my therapy table,) I have a bulletin board atop the shelving unit. I use this board to display our school-wide behavior plan poster — a nice reminder for the students and a nice way to prevent me from having to continually update bulletin board displays!  Look closely on  the lower right side of the bulletin board and you will see some visual prompts I keep on pocket rings…I use these often with students who need behavior supports; many of these students have their own pocket rings I gave teachers use with them throughout their school day.

On the counter below the bulletin board, I keep my artic cards, picture vocabulary cards and other Fun-Deck materials. I also keep binders with adapted reading program materials, Core curriculum standards and other resources.

Well, there it is. My small but sweet therapy space where amazing things happen! Hope you have enjoyed this up-close and personal tour of my home away from home. I would love to know how this room compares to rooms that other SLPS use — I am grateful for this space but always wishing for a bigger room to allow for even more creativity (I’m thinking circle-time area, play house, puppet theater, pretend store, gross motor area and more!) A girl can dream, right?! Thanks for taking a peek and for visiting LiveSpeakLove!

Free Downloads, Language, Resources, Technology, Therapy Tools, Thoughts and Inspirations

Visual Supports for Behavior

I was trying to think of a clever title for this entry…some alliterative phrase  that captures the essence of my theme. I quickly decided to stick with the matter-of-fact title, “Visual Supports for Behavior,” because matter-of-fact is what my message is intended to be — children often need visual supports for behavior. We know that certain students respond particularly well to visual supports. Research documents the need for visuals with the autism population, and there are many great options for visuals to use throughout these students’ school day. But what about students who do not have autism? Might they need visual supports as well? Absolutely!

Using visual supports in a school environment targets diverse needs across student populations. Visual supports can tap into the learning styles of students with a preference for visual presentation, assisting them in the processing and storage of information. Visuals can also increase comprehension in students struggling with auditory comprehension, providing a visual prototype that can hold meaning for them in a confusing world of fast-paced direction and instruction . Students with attentional difficulties often need visual supports as well. For a student overloaded with environmental stimuli in a busy classroom, visual supports can help capture their attention and give them a concept on which to focus as they process verbal information.  In addition, many students with executive function difficulties (related to attentional difficulties) might appear to grasp a concept well during group instruction. Students can follow along with information as a teacher visually demonstrates a concept and walks the class through tasks in step-by-step fashion. However, when asked to apply that same skill to complete individual seat work, students with attention and/or executive function  difficulties often flounder. But visual process charts and graphic organizers can help students complete tasks with independence as they practice the skill. A great site for graphic organizers is found here, but I often make my own to meet individual students’ needs.

One way I frequently use visual supports is to address (or prevent) behavior problems. Many students with special needs have deficits that can trigger behavior issues. Students with language difficulties often have difficulty expressing how they feel, or what they want. Issues with impulse control may interfere with classroom routines and social interactions. Students living in poverty or unstable homes may have difficulties coping with the demands of  a structured learning environment. Little three and four year-olds without any prior school experience are now attempting to navigate the social world of new people and new expectations. They long to interact with peers but do not yet know how to properly initiate that interaction. Sitting on the rug at circle time is a challenge when they are accustomed to free play and exploration. All of these issues can cause negative behaviors to emerge, behaviors that can interfere with the learning of others. SLPs are frequently involved in the problem-solving process and are uniquely skilled at developing materials to address such behaviors. Social stories, super pictures, behavior charts,  incentive charts, picture schedules and communication boards are all strategies SLPs keep in their toolbox so that students can make progress in the classroom.

 Here are a few of my favorite visuals, resources that I specifically designed for students needing visual input to assist with comprehension of expectations. I have experienced great success using these simple but powerful tools.

Visual display to help students express how they are feeling (sometimes they don’t even know until the visual seems to “match” what they are experiencing):


Another visual display that was made for a student to keep on his desk so that he could express the emotions he was frequently experiencing: 

Often students need individualized prompting during instruction time to follow classroom rules and expectations. Younger students and/or students with impulsive behaviors need one-step verbal commands to remind them of what they should be doing. These pictures can be cut apart, laminated and placed on a key ring for portability and easy access, or they can be enlarged and cut apart to use as a super-picture presentation. I keep these pictures and other similar visuals in a pocket chart on the wall in my therapy room:

One of my FAVORITE, most often-used visual is the First-Then board. I am posting one template below, but I have many other styles I frequently use. I have also been known to grab post-it notes in a therapy moment when necessary, and draw pictures depicting the first-then expectation. I verbally use this terminology to communicate expectations, even with my own children. “First homework; then T.V.”  The idea is to state the expectation, and when it is finished a more preferred activity can be completed. The first-then chart posted below was used most successfully with a high-functioning student with autism who could complete his classwork with assistance when he tried, but he often became overwhelmed and refused to attempt anything. The classroom teacher and I worked together with the student to identify a list of brief, preferred activities that could be used as a reward after he finished his assignment. The student chose pictures of the preferred activities to place on the bottom row of the chart each day (things like get a drink, color a picture, take a walk, say hi to people in the office, etc.) For each activity he was assigned, he chose one of his preferred options and placed it on the “then” spot. (e.g., First – math worksheet; Then – color a picture.) With a motivating goal easily within reach, the student was able to complete chunks of work and take mini-breaks for rewards throughout his day. His meltdowns literally vanished within a day or two of introducing this tool:

For students needing a visual reminder of how to make “happy” choices, I often use these supports:

A great tool to give (positive and negative) feedback to a student while you are teaching is a non-verbal signal or visual — no need to stop instruction and give negative attention to a child who is misbehaving. With older students, a simple thumbs up or down could work. With younger students, I like to use the happy face/ sad face flip visual. Just cut out the two circles, laminatend tape to opposite sides of a craft/popsicle stick. Present any student with nonverbal feedback as you continue with your lesson. I have witnessed more than a few students break their cycle of negative behaviors by experiencing confidence and success when they are rewarded positively with the “happy” side (catch them doing something positive whenever you can — it works!)

The beauty of visual supports is that they can be tailored to exactly fit the situation at hand. Programs like PowerPoint, Boardmaker, ActivInpire, MS Word, and many others allow for creative design and image selection. The internet hosts a wealth of ideas, templates and other resources to help in the process. The bottom line? Many SLPs and teachers encounter students who are struggling to meet curricular and behavioral expectations. Can we eliminate what is causing those issues?  Unfortunately, not usually. But visual supports are a wonderful tool (and in my experience, sometimes the solution) to helping these students move beyond barriers that block their progress. Increased comprehension, independence and compliance result in better learning opportunities for students, and better relationships with those around them.

Assistive Technology, Language, Resources, Technology, Therapy Tools, Thoughts and Inspirations

“SMART” Speech-Language Therapy

I am fortunate to work in a Title 1 school with supplemental funding to provide rich, technological experiences for the developing minds of our children. ELMOS, document cameras, mobile computer labs, and interactive whiteboards are familiar terms to teachers and students throughout my building. Today’s generation of children are ostensibly at a disadvantage if their education does not incorporate technology on a regular basis…a sign of the times. I’ve heard students in my school ask questions that make  me chuckle, like, “What’s an overhead?” or “Can we just Google it and find the answer?” I also had a student recently point to a picture of JFK on the wall in the hallway and remark, “Hey, I know him! He’s in my Black Ops game!” Ahhh yes, sign of the times.
  

Children today are surrounded by multi-media sensory input; instant gratification in the form of video games, cell phone apps, texts, on-demand video streaming, internet search engines and multi-media lifestyles. As a young, hip SLP (just go with it…I’m making a point here 🙂 ) I prefer to reach students where they are and provide therapy activities  incorporating technological resources, whenever possible. Feeling a bit passionate about the idea of addressing multiple learning styles (visual, auditory, kinesthetic and tactile) and building brain connections through  a multi-modal approach to instruction, I even began a technology initiative for the SLPs in my school district this year. A Technology Committe was formed with interested participants, and we have been meeting periodically to develop systems for  creating and sharing technological resources. We hope that other SLPs in our county will take advantage of opportunities to incorporate technology into their therapy sessions. Our work is to be “unveiled” at a professional development next month, and preparing for the presentation is getting me even more excited about the work we have done.

In the LiveSpeakLove spirit of sharing resources, I thought I would post some of my favorite ways of incorporating technology into therapy sessions. My county has a strict policy for the use and approval of technology, so all the ideas I have here are limited to what is currently approved for my school distrcit (i.e., no iPad, iTouch or related technology; web-based applications and sites have been approved through our filter process.)

ActivInspire Flipcharts – My school system uses the ActivInspire software program as one way to create “flipcharts” or lessons to be used on interactive smartboards. I now have a desktop version of the classroom-sized whiteboard in my therapy room, so I am using ActivInpire Flipcharts for individual, small and classroom-sized groups. I really do not work for Promethean or ActivInspire, but this technology has changed the way I provide therapy. Check out this video for a quick overview:

You can create your own flipcharts using the program’s resource libraries merged with your own content, or find unlimited resources to download and adapt at the following sites:

Online Games/Activities – The internet is filled with language-rich games and activities that will engage learners and provide instant reinforcement for task completion. Not to take the place of traditional speech-language therapy with individualized instruction and feedback provided in a monitored, systematic format, online games are a unique supplement to the personal interactions we create in therapy. Some of my favorite sites are:

TinyEye Online Therapy – I found this wonderful, internet-based company several years ago when I worked for them providing online speech-language therapy (via Skype and the ingenious online therapy system they have created) with a school in China. Taking advantage of the time difference, I logged on several times a week after my own children were in bed and provided instruction and feedback to students in China (who were assisted by their teachers during our sessions.) This service delivery model is perhaps the REAL wave of the future. With critical shortages of SLPs throughout our world, companies like TinyEye have devised a way to use technology to meet students’ needs in an efficient, global model for services. Even if you have no desire to Skype with China during your normal snoozing hours (perhaps not for sleep-deprived souls with crazy lives, but I would do it again if a mutually-agreeable contract became available,) you can still take advantage of their online therapy games–FREE for school-based SLPs. Just register with them to receive access to games addressing myriad goals, objectives, skills and targets. Games can be added to online “backpacks” with access even given to students for homework practice. Here is just a sampling of the abundant online resources they offer:

Online "Backpack" of games to target individual students

Farm Game - students click to answer WH qestions involving concept vocabulary

Animated Mermaid Matching game to target articulation skills through matching words or minimal pairs

PBS Kids Online Games – online games linked to curricular content, featuring characters from the PBS shows.

Nick Jr. Online Games – More online games featuring kids’ favorite characters. All of the games feature educational content linked to curriular vocabulary.

SMART Exchange – Images and smartboard lessons that are directly linked to State Curriculum Standards. Simply click on your state, identify the standard, grade level and subject area, and VOILA!! Instant resources available to you that address those standards. Here is a glimpse of a search I did for third grade language arts activities using the Maryland Core Standards:

Online Multi-media resources – Images and videos can be directly inserted into flipcharts, smartboard lessons, or PowerPoint presentations to increase student engagement through visual stimuli, sounds and animation. I frequently search for images to use in Boardmaker documents, to target  populations that comprehend and store vocabulary labels significantly better when real images are used (see this article for a brief rationale.) I also use sound effects and videos frequently in computer or smartboard-based lessons. Children in today’s world — a world filled to the brim with t.v. shows, video games, computer games, cell phone games and so on and so on and so on — love the power in clicking an icon or button to create instant visual or auditory feedback. Here are my favorite tools for creating multi-media delight in therapy activities:

  • Google – Wow, images and animations galore, many of them free! (just make sure you have an antivirus program installed before you click on links you find.) You can search for gif animations, videos, and even use their image search feature to locate the exact image to insert into your lesson.

Snapshot of Google Image search results for "bears"

  • YouTube – Not just for watching Ellen’s Favorite Videos or  the latest Adele performance  — there are amazing, inumerable educational resources found on youtube. Read this entry to see an example of one video I used in a language lesson for young students. My seventh grade son reviews algebra concepts each night by watching youtube videos from KhanAcademy. You can even learn how to increase your use of technology in therapy by watching podcasts from one resourceful SLP!
  • Watch Know Learn – free, organized database of educational videos covering all subjects and grade levels.
  • Self-made video clips – my school purchased several flip cams that many of us use. With these cameras, students can be video-taped (abiding by confidentiality requirements) and inserted into presentations. Therapy sessions can include self-assessment and monitoring pieces with this tool, and provide documentation for acquisition of skills. Plus, kids just like it.
  • Video Montage Programs – Pictures and video clips can be set to music and preserved using slide show programs like Animoto or Windows Movie Maker . I often use programs like these outside of therapy as well (e.g., to document accomplishnents during school-wide assemblies, or to document my own family photos in a creative way.)

This is just a quick overview of some of the tools I routinely use to increase student engagement and give them multiple ways of processing and responding during our sessions. For even more ideas, check out suggestions from the National Center on Universal Design for Learning (UDL.) In addition to technology ideas, their list of suggestions includes ways to adapt materials for various disabilities and activate background knowledge in students across populations. A fantastically huge database of web-based resources is presented as it relates to UDL checkpoints.

Feel free to let me know what types of technology you are using and how your students or children respond. We live in a dynamic, fast-paced world where “smart therapy” means more than just keeping up with the latest reseatch. To be truly “smart,” we now need to step out of our comfort zones a bit and embrace the technology that surrounds us.